Rotate Material ( Modeling )

Tool summary :

  • Can be used to rotate a material around X and/or Y and/or Z axes originating at its origin reference point.
  • The origin reference point's location remains the same as the rotation proceeds.
  • Material can be rotated using three different coordinate systems : member, global, material. Since material coordinates are relative, Rotate Material does not necessarily re-create the original material orientation if you re-enter the original coordinates. For member and global coordinates, Rotate Material can re-create the original orientation.
  • On this page, see example 1 and example 2 and example 3 and the step-by-step instructions .

Also see :

page 1 | contents | model > material > | model -- material | material tools


   Examples (also see the step-by-step instructions ) :

Example 1: The following example shows the changing of a material's rotation by selecting ' Member ' as the " Coordinate System ," then changing the amount of rotation assigned to the " Z " field.

1 . Invoke Rotate Material .
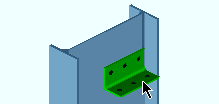
2 . Select the one material that you want to rotate. The material changes to the " Primary selection color " (green in this example).
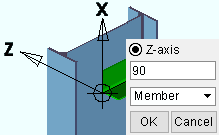
3 . On the Rotate Material window, change the material's rotation around the X axis, Y axis or Z axis, then press Tab . In this example, " Member " axes are shown.
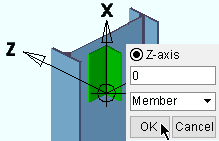
4 . The material rotates to a new position -- in this example, to ' 0 ' degrees around the " Z axis ." Press " OK " when the material is positioned where you want it to be.
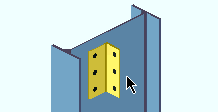
5 . The material is now rotated to a new position.

Example 2: You could have achieved the same results as shown in example 1 by selecting ' Member ' as the " Coordinate System " and " Z-axis " as the axis, then pressing the " Rotate - " button an appropriate number of times (as determined by the " Increment " field).

Example 3: Another way to do the same rotation as in example 1 is to change the " Coordinate System " to ' Material ', enter '-90' to the " Z " field, then press Tab on your keyboard.

page 1 | contents | model > material > | model -- material | material tools | top


   Step-by-step instructions (also see the examples ) :

The following instructions assume that you are using a 3-button mouse. You must do either step 1c (preselection) or step 3 (in-tool selection) to perform this operation.

1 . Before using this tool:

1a : Make sure that the member whose submaterial you want to rotate is displayed in one of the three solid forms .

1b : If you are going to do 1c, you must set the selection filter to ' Material ' if you want to be able to select a connection material or a member main material as the material to be rotated.

Select Items bindings (step 1c)

1c (optional) : In Select Items mode with an appropriate selection filter selected, left-click ( Select ) the one (1) material that you want to rotate. When selected, the material will be displayed in the " Primary selection color ," which by default is green.

2 . Invoke Rotate Material using any one (1) of the following methods:

Methods 1, 2 & 3 : Click the icon, or use a keyboard shortcut, or use the context menu. A Rotate Material icon can be added to your toolbar (classic) or ribbon (lightning). The icon, keyboard shortcut or context menu command can be found in the group named ' Model -- Material '. For lightning, Customize Interface is used to configure ribbons, keyboards, the context menu and modes.

Method 4 : If " Modeling layout style " is ' Classic ', you can use the menu system to choose Model > Material > Rotate .

Method 5 : With Material Mode mouse bindings active, place your mouse on the material you want to rotate, then hold down the Ctrl key and right-click ( Rotate ).

3 . Skip this step if you already selected a material in step 1c.

Select One Item bindings

3a (if you didn't preselect) : Rotate Material prompts you to use Select One Item mouse bindings to left-click ( Select ) the one material you want to rotate. This prompting also occurs when more than one material or a member (rather than a submaterial) is selected.

4 . The material origin reference point symbol (cross hairs within a circle) is shown on the material. The axes that you can rotate the material around (by default, " Material " axes) are drawn on screen through the origin symbol. The Rotate Material window opens. To rotate the material, either do steps 4a to 4e or the alternative procedure:

4a : Select the " Coordinate system " that you want.

4b : Select the axis ( " X " or " Y " or " Z ") that you want to rotate around.

4c : Enter a number (of degrees) to the " Increment " field.

4d : Press the " Rotate + " or " Rotate - " button to rotate the material.

4e : Repeat steps 4a, 4b & 4c for different axes until the material is positioned the way you want it. Press the " OK " button to close this window and save your changes to the 3D model.

An alternative procedure: Instead of doing the above, you can enter a number (of degrees) to the " X " or " Y " or " Z " field, then press Tab to cause the material to rotate around that axis.

Tip: Press the " Reset " button if you want the material to revert back to its original rotation.

5 (if applicable) . Skip this step if it does not apply. If the material that you rotated was system generated (as opposed to user-added), you get a warning stating that the "Connection will be changed to a Graphical User Connection."

Alternative 1 : Press the " OK " button to make the new material rotation permanent. Go to step 5.

Alternative 2 : Press the " Cancel " button to cancel the Rotate Material operation and keep everything as it was before step 2. Do not continue.

6 . The material is now be rotated as you specified in step 4. The mouse bindings that were active before you invoked Rotate Material become active again.

page 1 | contents | model > material > | model -- material | material tools | top